| | Blu-Ray To Mp4 - Megui Updated: 03/04/2009 09:23 AM
Synopsis: Using MEGui to convert any DirectShow compatible video source to H246 (MPEG-4). With this guide you will be able to convert AVI, DVD, Blue-Ray, HD-DVD, Real Media, or any other video source that can be played via the DirectShow interface (the file plays in Windows Media Player). All of the tools listed here are open source or freeware.
Tools Needed:
MEGui ( http://sourceforge.net/projects/megui )
Note: there are many sub tools that are loaded under MEGui. Those tools are downloaded automatically the first time you launch MEGui.
Suggested Tools:
FFDShow
Haali Media Splitter
Media Player Classic
VirtualDubMod (for AVI Sources)
Note: If you are having difficulty reading your source files due to codec issues, you can try demuxing your source file using TsRemux. This can be useful if you want to grab a specific audio track from an HD source.
Testing your configuration:
In order to properly input Blue-Ray/HD-DVD video, your PC must be capable of using DirectShow to play back the M2TS or EVO files. To test this, you can create a simple AVISynth script with Notepad. If you know yours is working, you can skip this step.
Your AVISynth script should have only one line. In this example I'm simply checking to see if the script will play back in Media Player Classic. If you are not familiar with AVISynth, I would suggest you check the GUIDES section as that is another topic. The script in my example needs only one line. This will allow me to verify my AVISynth install is working and that DirectShow can properly decode my source. Open Notepad and use the DirectShowSource command to point to our input file:
DirectShowSource("C:\Media\Video\HP5_PHOENIX\BDMV\STREAM\00000.m2ts",fps=23.976,audio=false)
Note that you could use the above example for your input, but it may not match your source, and of course the input file path wouldn't match your input. Lastly, the frame rate (FPS) may not match your source You would need to correct those three things for your specific input. In any case, once you have created and saved your sample AVISynth script with Notepad, save it as "test.avs". You can then open it with your player of choice. I prefer Media Player Classic. If your PC is properly configured, you should get video with no audio. Note that it doesn't have to play smoothly as your PC may not be capable of keeping up with 1080p video. Once you have verified that your PC is able to read the input via DirectShowSource, then you are ready to move on to the next step. If your PC will not open the file (you get filter errors with AVISynth), then you have Codec issues. This is not something that a generic guide can help you with as the possibilities are almost endless as to what you may have installed and what order your filters are using. You should post your specific issue in the main forum to resolve those issues. For my test bed, I installed Nero, FFDShow, Haali, Media Player Classic, and VirtualDubMod. There were no other codecs installed. I also disabled the Nero Splitter as it overrides the Haali splitter, preventing Haali from being used. This is an example of software causing conflicts 
I've also been told by rhegedus that .EVO files from HD-DVD in particular can be problematic for DirectShow decoding. This is most likely due to the splitter that is being used. You can manually demux the file (the splitter would normally do this for you). In any case, If you are having problems with .EVO source files, use the following steps to demux your files and then use GraphEdit to create a DirectShow compatible file.
Demux/Rebuild the EVO with EVOdemux to remove unwanted audio streams and subs then use GraphEdit:
Haali Media Splitter ---> WMVideo Decoder DMO
Once you have built that filter with GraphEdit, save it as video.GRF and make and AviSyth script with Notepad or a similar text editor:
| Quote: |
DirectShowSource("C:\FILEPATH\video.GRF",fps=23.9759856527702,audio=false)
ConvertToYV12() |
and save that file as a .avs file. If everything has gone well, you should be able to play that .AVS file in your media player.
Configuring MEGUI: (Version 0.2.5.1007)
Ensure you have a recent build of MEGUI. If you are running Windows Vista, I would suggest you run MEGUI with full admin rights (Right click the Shortcut icon, select Properties -> Advanced Button -> Check 'Run As Administrator'). The program has a self updater, however under Vista, it will not allow MeGUI to launch all outside processes or restart properly. turning on the Administrator option will allow the Update process to function properly under Vista.
The first time you Launch MEGUI, it should inform you that updates are available. Allow it to update and restart. It will also ask you to import various Video and Audio profiles. Make sure you Shift Select all of the profiles it offers so that you import all of them. You can also hold down the Control Key to select individual profiles to import if you know you only want specific profiles.
The only item that will not update automatically is the Nero Digital Audio codec pack. You can download it for free from the Nero site ( http://www.nero.com/nerodigital/eng/Nero_Digital_Audio.html )
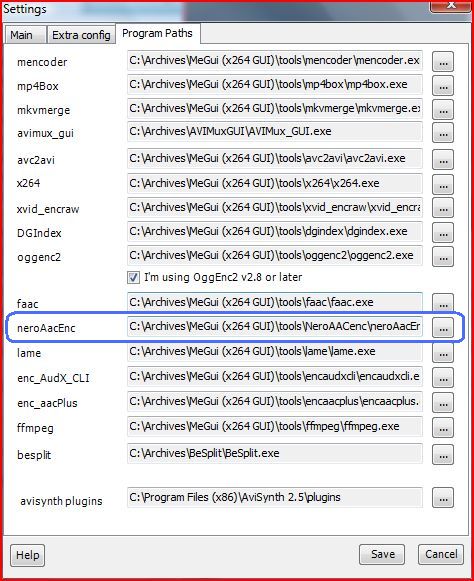
Once you have downloaded the files, place them in a TOOLS\NeroAACenc folder of your MEGUI install (the Tools folder will be created after MEGUI updates). Just create the NeroAACenc folder. You must also point your MEGUI configuration to that folder for the Nero audio. To do so, select TOOLS -> Settings from menus, and then the Program Paths tab. Click the button next to NeroAACEnc and browse to the "neroAacEnc.exe" executable.
MEGUI itself only accepts input from AVISynth files (.AVS). AVISynth in turn can accept input from a multitude of input sources. I assume the reason for this is just to ensure they have consistent input on a known interface. Makes troubleshooting and coding easier I suspect. No worries if your AVISynth impaired however, as it has a handy AVISynth Script Creator that will do the dirty work for you. Lets get started...
Selecting your input:
To select your input, you must give MEGUI an AVISynth input file to work with. For this example, I'm working on a Blue-Ray rip. You can use almost any type of input however (DVD, AVI, TS, RM, etc). If you drag and drop a source video file onto MEGUI it will typically open the AVISynth Script Creator for you. Under Vista, the drag and drop doesn't function so you always have to browse to your source. For simplicity's sake, I would suggest you just select the AVISynth Script Creator manually from the menus.
The idea here is to browse to your MPEG, AVI, .D2V file, or whatever source your using with the AVISynth Script Creator. From that, an AVISynth script file will be created that will be used as input for MEGUI. Open the AVISynth Script Creator now from the TOOLS menu (Tools -> AVISynth Script Creator). Note that there are Keyboard shortcuts listed next to most of the tools if you like that sort of thing (Control + R).
In the Video Input section, you select your input file. The Script Generator will accept input from any DirectShow compatible source, although the input is filtered to show only the following file types:
Dgindex (.d2v ) files
mpeg-2 (.m2v, .mpg )
.avi,.mp4,.mkv, .rmvb
VirtualDub frameserver files
You can also just enter an asterisk "*" to force it to show all files. Again I should note that you can technically use any input that can be read via DirectShow ( files like .m2ts, .ts, etc will work as long as you have the necessary codecs installed). This allows you to convert files like Blue-Ray, HD-DVD, HDTV, etc. I would suggest you get a good splitter like Haali Media Splitter. FFDShow has also made huge leaps in quality. It's an easy addon that will allow you to decode and play just about any media file type.
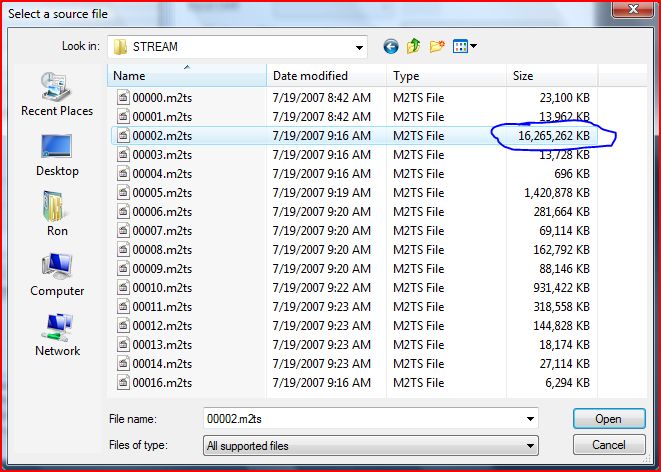
For my example, I'm going to browse to my Blue-Ray rip of The Fifth Element. The file has an .M2TS extension, so it's not an 'allowed' input type for MEGUI by default. However I have FFDShow installed and the Haali Media Splitter, meaning the file can be viewed with DirectShow. As you register files with a media player, they may show up in the list. Once you select your source file, assuming it is DirectShow compatible, it should show up in with a preview window. If you do not get a preview window, and you see an error, that would indicate your source isn't setup properly for DirectShow. Post your issue in the main forum in that case.
If your input source is MPEG based (.MPG, .TS, .M2TS, .M2V, etc), and you do not have compatible codec installed, you can use DGIndex to create a .D2V file which can be read by MEGUI. DGIndex is one of the Tools that is updated/downloaded automatically by MEGUI. You'll find it in the tools folder of your MEGUI install. Just drag/drop your MPEG file onto DGIndex, (see the GUIDES section for help with DGIndex) and save your project as a D2V file. For my Blue-Ray project, I will use DGIndex to extract the audio track from my .M2TS and to read the file since it creates a .D2V file for me. Note I could simply use the .M2TS file directly for video if I chose to since I have FFDShow and Haalie Media Splitter installed.
If your input source is AVI then you can simply select your AVI file directly.
OPTIONS Tab:
Once I select my Source .D2V file in the AVISynth Script Creator screen I see a preview window. The preview window size can be changed by dragging the window edges. Bigger sources makes the window unwieldy so I would suggest you make it small enough so that you can see the MEGUI interface underneath. Leave the preview window open as we'll be modifying some elements on the preview screen.
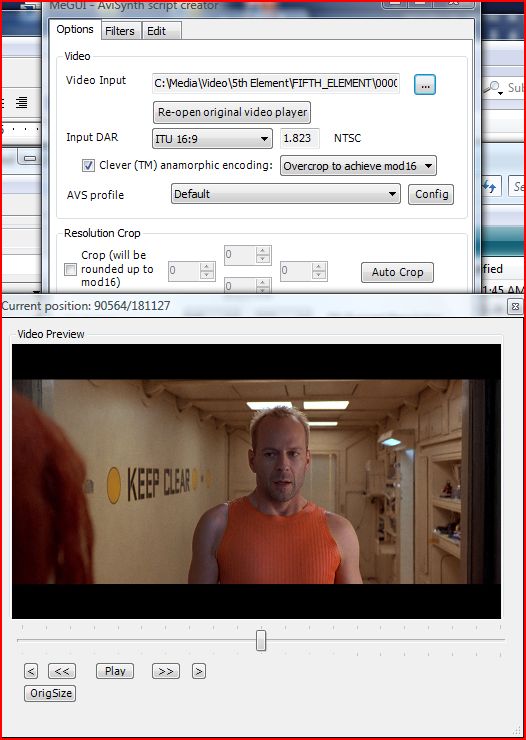
The Input DAR (Display Aspect Ratio) should be displayed. In my case, my input is 16:9. Directly below that is a checkbox for 'Clever (TM) anamorphic encoding'. This option allows you to simply encode the video as is without any drastic resizing. This is desirable so that you do not have to unnecessarily resize your video. The encoding process will embed the Aspect Ratio of your video when it is encoded so that it is stretched back to the proper proportions during playback. I would highly suggest you select this option. For the Anamorphic option, I always choose "Overcrop to achieve mod 16" to avoid any resizing at all. If your a bit anal about having any of your video cropped, you can choose "Resize to Achieve Mod 16". MEGUI will require that your video's dimensions are divisible by 16. Choose on of those two options (resize to mod 16 or overcrop to mod 16).
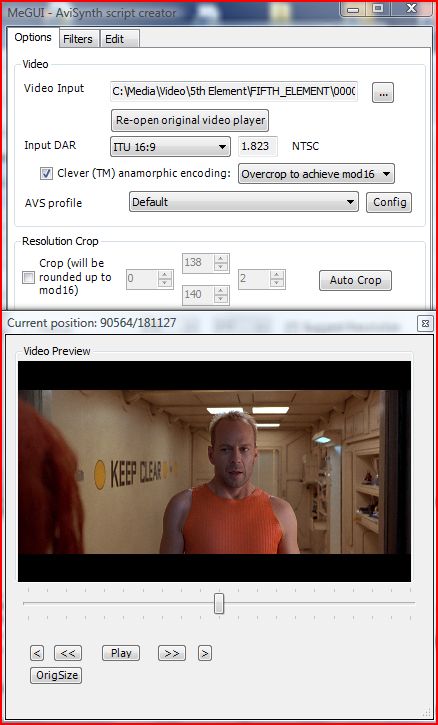
Below that, you'll see the 'Auto Crop' button. This function will easily remove any letterboxing that may be present. It will also remove any wasted black or noisy edges on your video. I would suggest you use it every time, even if your video appears to fill the preview with no letterboxing.
(Before Autocrop)
(After Autocrop)
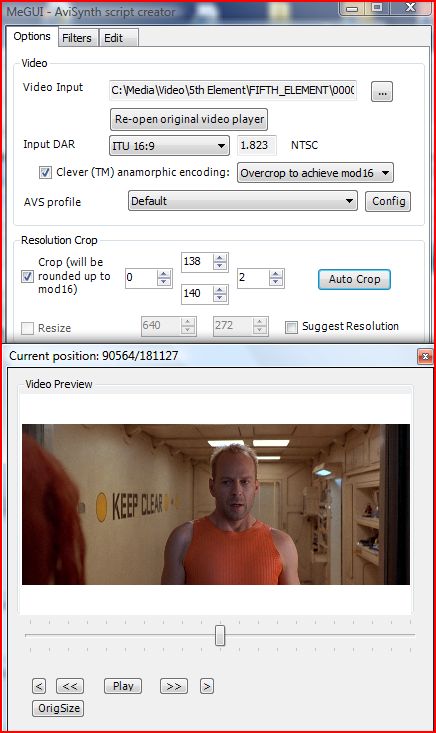
Once you have the preview properly cropped, then click on the FILTERS tab at the top of the MeGUI Avisynth Script Creator window.
FILTERS Tab:
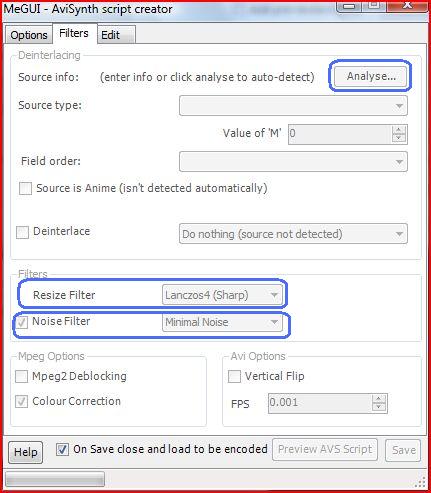
From here you should analyze your source video for interlacing and field order. This is important and not something you should skip. I can't say how many times I've encoded a project that seemed to be entirely progressive only to find a scene that was mixed. Getting the field order right is also important. Note that if your source is Anime/CGI then you should check the option "Source is Anime (isn't detected automatically)" before analyzing your material. Once the analysis is completed you can also choose what Resizing and noise filtering options you want. Since we are using the 'Clever Anamorphic Encoding' option, we won't be resizing anything. This option is applied only if you are actually resizing the video. If you selected "Resize to achieve Mod 16" on the Options tab then I would suggest you select Lanczos4Resize as your resizing option. That would give you the sharpest resize with the least loss of detail. I would suggest you always leave "Minimal Noise" selected, even for 'clean' sources. For older source material, I would suggest you select "Little Noise". Anything beyond that can have a noticeable softening affect which you may find unpleasant. Experiment here to find what you see as acceptable. This setting can have a very beneficial effect on Bit Rate usage even when the noise isn't immediately obvious to you. Below that you also have options for Mpeg2 Deblocking and Colour Correction. The Deblocking option is useful if your source has obvious macroblocking (this would sometimes be the case on previously encoded MPEG material like home burned DVD or SVCD's). The Colour Correction option ensures the colors are calibrated properly. I tend to avoid both of these filters as I have found little use for them.
EDIT Tab
The EDIT tab allows you to make any final modifications to your AVISynth script before saving it. For instance if you wanted to tweak some of the filter functions, resize it or add an additional filter, etc. You can also add preconfigured text that will always show up here. You'll find those options in your MEGUI settings. If you have no other modifications to enter, you can just click SAVE in the bottom right corner of the AviSynth Script Creator window.
From here you will have a Preview Window and you main MEGUI screen with the Input Source filled in. You can also click the 'Show DAR' option to see what your output video will look like on playback (that options displays your output properly stretched out according to the Display Aspect Ratio).
At this point you can close the preview window.
Choosing your Video Profile:
Choosing a video profile may seem a bit daunting considering the options you are presented with. There are a few factors to take into consideration when you do choose one.
What is your target player?
What kind of processing power do you have to encode your media with?
How much time do you want to spend?
If you are encoding video for an iPod for example, you would want to choose an iPod compatible profile. If you have an older PC (non-dual core) then I would suggest you use CE-Mainprofile. If you have a faster CPU, or Dual-Core, then I would suggest you use the AE profiles. I always use AE-Maxquality or AE-Goodquality with a tiny bit of tweaking.
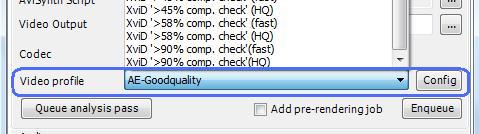
For this example, lets choose AE-Goodquality. It's a good tradeoff for excellent quality although it requires high cpu specs. I would highly suggest you have decent CPU power (read: dual core) to use the AE profiles with the settings I'll be suggesting. Choose the profile from the Video Profile dropdown, and then click the Config button.
Video Configuration Dialog:
MAIN TAB
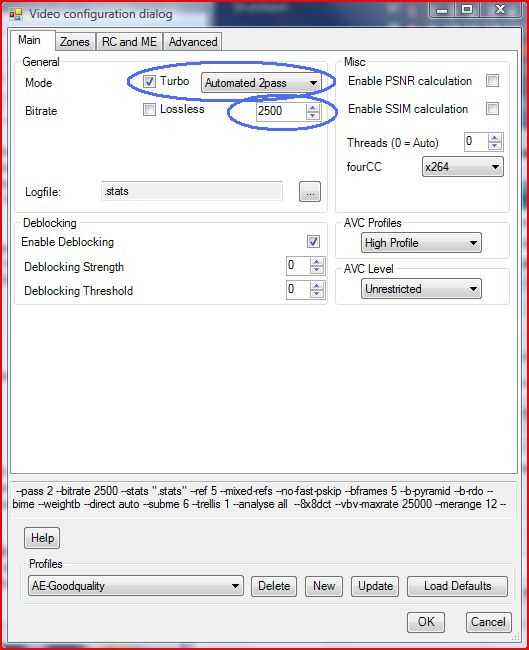
Turbo should be enabled
Select Automated 2pass
For the bitrate, that would vary depending on your source. If you are encoding an AVI or DVD, you can start with the bitrate as low as 700 or so. The default is 1000 which will work fine. If your not sure you can encode a small sample by adding a the following at the end of your AVS Script:
TRIM(1000,6000)
That will encode a portion of the beginning of your video. Just don't forget to remove it from your AVS script before doing your final encode.
General guidelines for encoding bitrates:
For typical XviD/DivX AVI's I would suggest you start with 600-700 kbps for bitrate
For DVD Rips I would suggest you start with 800-1000 kbps for bitrate
For Blue-Ray/HD-DVD/HD @ 720p I would suggest you start with 2000 - 3000 kbps
For Blue-Ray/HD-DVD/HD @ 1080i I would suggest you start with 3000 - 4000 kbps
For Blue-Ray/HD-DVD/HD @ 1080p I would suggest you start with 4000 - 5000 kbps
(note that these are guidelines only...it depends entirely on your source video)
Set the remainder of the Main tab as shown.
ZONES TAB
This tab allows you to specify custom bitrate zones much like MPEG-2 encoders used. I rarely use this. Just be aware that if you have a problem scene that seems to be getting excessive macroblocking you can tweak that 'zone' here.
RC and ME Tab - This TAB has four subsections - Rate Control, M.E., Misc, and Quant Options
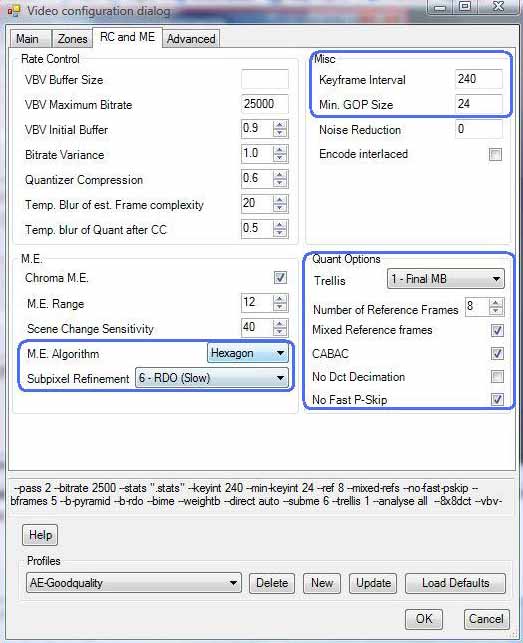
These sections contains the guts of the H264 codec. These settings also have a huge impact on the speed that your PC will encode your output. The items of interest are highlighted.
Rate Control section
Leave the Rate Control section at the defaults.
M.E. Section
Set your M.E. Algorithm to a minimum of Hexagon. If you have the CPU power I would suggest you set it on Multi-Hex.
Subpixel Refinement:
I would not suggest you go any higher than '6 - RDO (Slow)'. RDO Level 2 is EXTREMELY slow for very little gain. 6 - RDO is required to use 'RDO for B-Frames' on the Advanced Tab. I would suggest you select 6 - RDO.
MISC Section
Set your Keyframe interval to 10 times your output video's framerate. If your encoding video that is 23.976 frames per second, then set the Keyframe Interval to 240. If you wer encoding video at 29.97 fps, then set your keyframe interval to 300.
For the Min GOP size, set this to the rounded value of your framerate (ex: for 23.976 framerate video set it to 24).
Quant Options
Trellis: Set this to 1 - Final MB. Optional set it to '2 - Always' but expect a bit more processing time
Number of Reference Frames: Set this to from 5 to 8. This value can have a big impact on your processing time. The lower the number the faster the encode. The higher the number the slower the encode, but the better the quality. Note that values over 5 give marginal improvements. You can go as high as 16. Do not set this value lower than 3.
Set the rest of the options as shown.
ADVANCED TAB
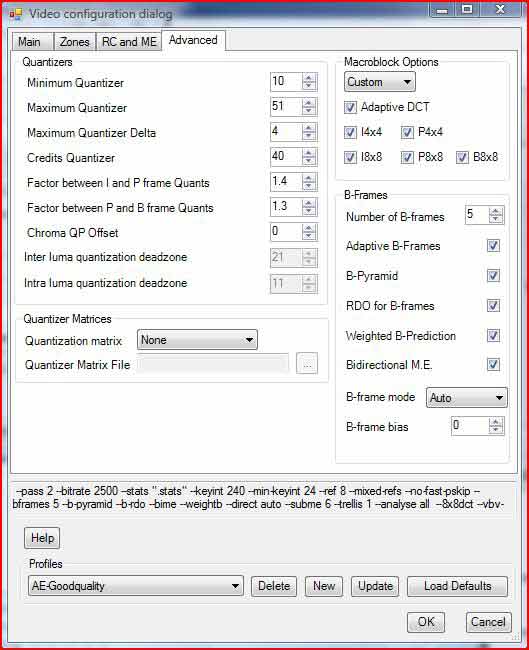
The only options you should tweak here are on the Macroblock section, or the B-Frames section.
For the macroblock Options, I would suggest you enable all of them for maximum benefit.
In the B-Frames section I would suggest you set this to 5 for maximum benefit. Don't set this value lower than 2. If a setting of 5 is too slow for your configuration, try setting this to 3. The reason I suggest 5 is that using the B-frame mode to Auto typically won't ever use more than 5 B-frames.
The remainder of the B-Frames options should be enabled and the B-Frame mode should be set to Auto. Note that RDO for B-Frames will not be available unless you selected "6 - RDO (Slow)" or higher on the RC and ME Tab.
Configure the remainder of the Advanced options as shown. If you want to save these settings in a new profile rather than overwriting one of the default profiles then click the 'New' button and give your profile a new name. Otherwise, just click the 'Update' button and then click OK.
This will put you back to the Main MEGUI page. At this point, you can begin encoding your video if you like, however I would suggest you also setup your Audio option at this point.
For you audio, you can demux it using a variety of methods depending on your source material. For any MPEG-2 type material (.m2v, mpg, .ts), use DGIndex to save the audio. For AVI material, use VirtualDubMod and the STREAMS menu to demux your audio. Once you have an audio file, simply use the Audio Input button to select your audio file.
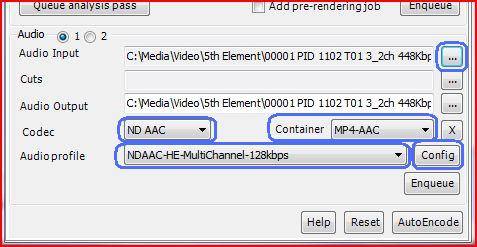
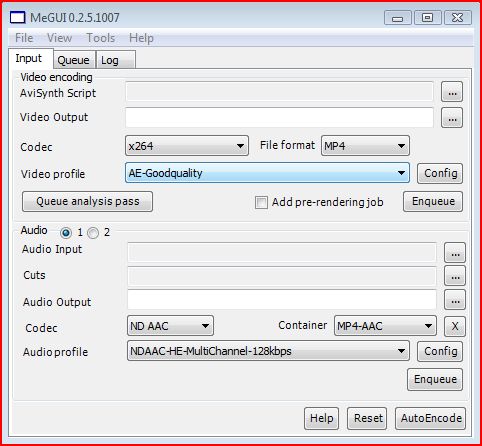
For the Codec select "ND AAC" if you downloaded the Nero Digital Audio codec. If not, select FAAC.
For the Container select "MP4-AAC"
For the Audio Profile, select NDAAC-HE-MultiChannel-128kbps if you downloaded the Nero files, or NCTAAC-HE-MultiChannel-128kbps if you did not download the Nero files.
Click the CONFIG button to configure the selected profile.
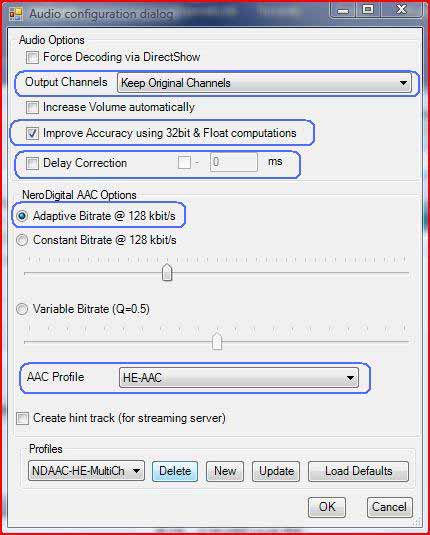
Select the options as shown. If your audio file needs a delay correction, then place a check in th Delay correction box. If your audio has a negative ( - ) delay correction then place a check next to the minus (-) sign and input the number of milliseconds to offset your audio.
IMPORTANT: If you decide to encode your audio, ensure it has a different filename than your video output!! You can end up overwriting your video with your audio file. The program does not double check this for you so be warned!
If you want to keep your original audio without re-encoding, you can mux your output as an MKV file instead of an MP4 file. If you choose to do that it is not necessary to choose an audio file at this point.
If your ready to go, click the ENQUEUE button in the Video section, and if you are encoding Audio, click the ENQUEUE button in the Audio section. Now click the QUEUE tab at the top of the Main MEGUI window to see your queued workload.
Click START to begin the encoding process.
When your encode is finished, you must then mux your audio in with your video.
TOOLS -> MUXER -> MP4/MKV Muxer
If you chose to encode your audio to MP4 then you should choose the MP4 Muxer. If you chose to keep the original audio, then choose the MKV muxer.
Select your .MP4 Video file for the Video Input
Select your audio input for the Audio Input section.
If you have an OGG compatible chapter file you can select it here. MP4 files support chapter points. If you want to rip these from a DVD you can use DVD Decryptor and select the 'Chapter Information-OGG' option. I haven't figured out how to automatically extract them from Blue-Ray just yet 
Last but not least, specify your final Output filename in the Output | Muxed Output section and click the QUEUE button.
After a few minutes you should have a completed file.
Note that you must have an MP4 compatible codec installed like Nero, or the freeware FFDShow to play back these files |
Url to this pages:
http://nade.dk/web/nade/site.nsf/FramesetHP?readform&wmain=files/Blu_Ray_To_Mp4___Megui
|