Hey people! I've made a major update to this article. If you are having trouble, you can always try the steps outlined in my
original post.
One of the cooler hacks that I've found for the
Wii
is how to store and load your games from a USB
Hard Drive
. The idea is that you plug a
hard drive
into one of the USB slots on the back of the
Wii
, and rip/store your games. When you want to play them, you have only to access the
hard drive
and select what you'd like to play. There are 3 primary reasons that I am excited to have this working:
- Convenience - It is so much more convenient to not have to screw around with finding/storing game discs. Now I can load them onto the Hard Drive
 and put them away in a closet.
- Speed - Ever get tired of listening to the Wii
 spin discs while trying to load content (especially cut scenes and saves)? This hack supports full USB 2.0 speeds, and you'll notice a significant decrease in the amount of time it takes to load games and game content.
- Storage - When you rip your games, the USB Loader is smart enough to know that it doesn't need to copy all 4.7 GB of game disc if it doesn't all contain actual game material. Turns out, almost all Wii
 games that I've seen are somewhere between 1-3 GB of actual storage. This means that you can backup many, many more games than would be possible when blindly ripping a full game disc.
IF YOU HAVE WII FIRMWARE 4.0 INSTALLED, I HAVE PUT TOGETHER A SPECIAL GUIDE JUST FOR YOU! PLEASE HEAD OVER TO MY HOW TO STORE/LOAD WII GAMES VIA USB HARD DRIVE FOR SYSTEM MENU 4.0 POSTING!
**Wii PUBLIC SERVICE MESSAGE: I would highly recommend that everyone TURN OFF their Wii
 Connect 24. I actually had the (inconvenient) experience of having the Wii
 network card get hot enough to damage the Wii
 GPU (graphics card). This resulted in irreparable and annoying black/white pixelation. This hardware flaw is *not* officially recognized by Nintendo, but is a common issue, please see this site for more information. After sending my original unit back to Nintendo (and paying $80 since it was out of their warranty period), I was given a brand-new unit with all of my save-games and other information intact. Disabling Wii
 Connect 24 will both prevent you from downloading/installing updates to the Wii
 System Menu before you're ready, and it will prevent your Wii
 from the above-referenced damage. Please do not chalk this up to internet rumor - the overheating issue exists, and it makes the Wii
 almost unplayable. Other references to the "Wii
 Black Dots of Death": GameSpot Forums, NeoGaf, nintendic. Joystiq, and a YouTube video that does a pretty good job of showing what it looks like **
What You'll Need
***NOTE - Seagate FreeAgent ARE NOT compatible with this hack. Several people (including me) have confirmed this. As a general practice, I recommend staying away from Seagate external drives because they have a long history of not being compatible with hardware hacks (such as Apple TV
 , DVR
, DVR and now Wii
 hacks).**
*
[UPDATE] Users have also reported success using the following hard drives :
AcomData PureDrive 1 TB USB 2.0/eSATA External Hard Drive PHD10000USE-72
Western Digital My Book Essential Edition 1 TB USB 2.0 External Hard Drive WDH1U10000N
:
AcomData PureDrive 1 TB USB 2.0/eSATA External Hard Drive PHD10000USE-72
Western Digital My Book Essential Edition 1 TB USB 2.0 External Hard Drive WDH1U10000N
 Getting Started
This article will not deal with how to install the Homebrew Channel on your
Wii
. If you do not have it installed, please visit the
Homebrew Channel website.
Step 1: Install cIOS
CURRENTLY RECOMMENDED VERSION OF cIOS: cIOS38_rev14
Because there is so much confusion about what cIOS is, and what it does, please head over and check out my post Wii cIOS - The Straight Dope
- Go here and download the recommended cIOS zip file.
- Unzip the cIOS[version]-installer.zip file and re-name the file called cIOS[version]-Installer.dol to boot.dol
- Plug in the SD Card
 that you typically use for Homebrew on the Wii
 (the SD Card
 that is used by the Homebrew Channel to load applications) and go into the apps folder
- Create a new folder called cIOS on your SD Card
 and copy the boot.dol file from above into it. You should now have apps\cIOS\boot.dol on your SD Card.
- Plug the SD Card
 into your Wii
 and launch the Homebrew Channel. You should see an application in there for your cIOS. Load that application and follow the instructions on the installer. Choose the internet installation if you have a wireless connection.
- If the installation is successful, move on to Step 2.
If you're having trouble with this step (especially if you're getting a 2011 error) it probably means you have System Menu 3.4 installed.
[SEE FAQs] for help with this issue.
Step 2: Install the USB Loader GX
**NOTE: There is a rather terse message in the comments from one of the authors of the USB Loader GX stating that I need to be sure to point out that this software is in beta phase and not anywhere near done. I recommended it because I think it's the best implementation of the USB Loader to-date, but PLEASE do not bug the USB Loader GX guys in their IRC chat rooms or forums with questions or problems. If you can't get the USB Loader GX to work properly, then USE ANOTHER LOADER such as Waninkoko's original USB Loader 1.5 or the Cover Flow Loader. There are detailed step-by-step instructions for installing the original USB Loader 1.5 in my original post. Thanks!**
I would highly recommend installing the USB Loader GX as your USB Loader of choice. There are several options for loaders (including the original Waninkoko USB Loader and the Coverflow Loader), but from what I can tell, the USB Loader GX is the easiest and most feature-rich. It enables updates from within the application, all known region patches and game fixes, and allows you to directly download game covers. This loader has eliminated several steps from my
original post.
- Go here to download USB Loader GX V1.0. If you're feeling adventurous, you can download the latest build - but I'd recommend sticking with the 1.0 since the videos are based on it, and it is the most stable release.
(If you downloaded the USB Loader GX V1.0)
**Note: The 1.0 version does not come with a forwarder. This means that you won't have a channel for the USB Loader on your Wii Menu. You'll need to launch the application from the Homebrew Channel**
- Unzip the USB Loader GX V 1.0.rar file. If you don't know how to extract a .rar file, go install 7-Zip, right click on the file and click 'extract to here'. You will now have a folder called apps. Inside the apps folder you will find a folder called usbloader_gx.
- Plug in the SD Card that you typically use for Homebrew on the Wii and go into the apps folder. Copy the usbloader_gx folder (and all of its contents) into the apps folder.
(If you downloaded the latest build)
- Unzip the USB Loader GX[version].rar file. If you don't know how to extract a .rar file, go install 7-Zip, right click on the file and click 'extract to here'. You will now have a file called USB Loader GX[version].wad.
- To install a .wad file, you must have Waninkoko's WAD Manager installed in your Homebrew Channel. To install WAD Manager, first go here and download WAD-Manager_v1.4.zip.
- Unzip the WAD-Manager_v1.4.zip file. You will have a file called WAD-Manager_v1.4.dol. Rename WAD-Manager_v1.4.dol to boot.dol.
- Plug in the SD Card
 that you typically use for Homebrew on the Wii
 (the SD Card
 that is used by the Homebrew Channel to load applications) and go into the apps folder
- Create a new folder called WAD Manager on your SD Card
 and copy the boot.dol file from above into it. You should now have the WAD Manager boot.dol inside apps\WAD Manager
- If you don't already have one, create a new folder in the root of your SD Card called WAD. Place the USB Loader GX[version].wad into that folder. You should now have WAD\USB Loader GX[version].wad on the card.
- Plug the SD Card back into your Wii and go to the Homebrew Channel. You should now see a WAD Manager application in there. Open the WAD Manager.
- Use the WAD Manager to install (from the SD Card) the USB Loader GX[version].wad file.
If all has gone according to plan, you have now installed the USB Loader GX. It will show up as a channel in your Wii menu and as an application in your Homebrew Channel. I would suggest watching at least the first two videos below to learn how to use the application (the third video just shows how to customize the skin of the application).
Step 3: Format Your External Hard Drive
1. Right Click on My Computer and go to Manage
2. Click on the Disk Management option on the left
3. When your disk drives have loaded, right click on the drive to be formatted to WBFS format (to be read by the
Wii
) and choose 'Delete Volume'
4. Now Right Click on the disk drive to be used and click 'New'
5. Be sure to assign a drive letter to your drive, and to choose NOT TO FORMAT the drive when you create your new partition
6. You should now have a RAW volume with a drive letter assigned in My Computer. I did this in Windows 7 (I'm assuming Windows Vista would work the same way). If you are having difficulty with this step of the process, try using a GParted Live CD to unformat your disk.
- Run the WBFS Manager. You will see an interface that looks something like this (this is from 2.2 - there are some new features and a nicer interface in 3.0+):
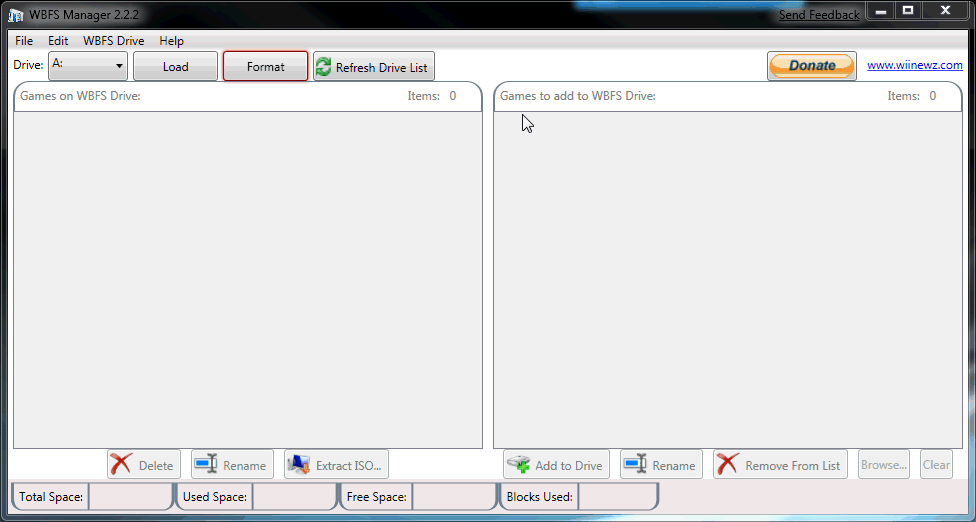
- Select the drive letter of your hard drive
 as assigned above. Click 'Format'. If it was successful in initializing the drive, then you are ready to plug into your Wii
 and start backing up your games. If your format was not successful, you will need to go back into the disk management utilities in Windows, delete the external drives' partition, create a new simple volume, assign a drive letter, DO NOT FORMAT THE VOLUME, and try again
Step 4: Put It All Together
- Plug your WBFS Formatted External Hard Drive
 into the back of your Wii
 and launch the USB Loader GX.
- If all is well, you should see a blank window. Insert a game disc into the Wii
 and click the + button. The channel will ask you if you are sure that you want to back up this game. Choose yes and watch it go!
And that's all there is to it! Now you have a fast, easy and convenient way to launch and store your game backups for the
Wii
. Also of note is that the WBFS Manager will allow you to copy your .iso game file backups from your external
hard drive
to your PC (very nice for an extra PC backup in case of
hard drive
failure).
**PLEASE TAKE NOTE: You should not ever, under any circumstance, pay money for ANY of the software in this guide. There are several seedy groups of people trying to sell the Homebrew Channel and/or packs of software for their own gain. I have scanned (using AVG Anti-Virus Free Edition) all of the files that I've linked, and none contain any form of spyware or malware. That said, I take no responsibility for the content of the sites that I've linked here. Don't be stupid - protect your computer by having good, up-to-date virus protection, and scan the files that you download from the internet. I will do my best to police the forums from people trying to sell Wii hacks, but don't be a sucker...DON'T GET SCAMMED AND DON'T EVER CONSIDER PAYING FOR WII HOMEBREW SOFTWARE!**
FAQ's
Here are some FAQs for this article based on the comments.
Q: Is this mod compatible with Gamecube games? Will it work if I try to backup and play a Gamecube game?
A: No. This mod is not compatible with Gamecube games. From what I can gather, because the Gamecube did not have a USB slot, it would be a pretty tremendous effort for the guys coding this stuff to figure out how to get the Gamecube engine to recognize the USB drive.
Q: Are there any other loaders available? I'm having trouble/not liking the USB Loader GX
A: Yes, there are a few. I would recommend either the
original Waninkoko USB Loader 1.5 (if you're looking for very basic functionality) or the
Coverflow Loader (see video below).
Q: What the heck is cIOS? Can you explain?
A: Yes, please see my article
Wii cIOS - the straight dope.
Q: When I'm installing the homebrew channel from the HackMii installer - should I install BootMii? What is it and why do I need it? Should I install as IOS or boot2?
A: There is a rundown of how it works and what it does
here. I would recommend that everyone install BootMii to give them some basic brick protection. I've gone ahead and
written a little piece on what I know about BootMii and how I set it up.
Q: Can I use my Hard Drive for more than just Wii game storage?
A: Yes, it is possible to partition your hard drive to have a chunk of it formatted to WBFS and another chunk at FAT32 or NTFS. Bear in mind that most homebrew applications require a FAT32 formatted partition (they will not read NTFS). It's a little bit more advanced to set up, but is absolutely doable. I haven't been able to confirm this, but people have reported that you should always have your WBFS partition as the first partition on the drive in order for it to work smoothly with the loaders.
Q: How do I get the game covers to download in USB Loader GX? How do I update USB Loader GX?
A: Please watch the tutorial videos in step 2 above.
Q: I keep getting a -2011 error when I try to install cIOS! I have system menu 3.4 - what do I do?
A: Rob in the comments reports that
this article can show you how to get yourself back up and running. Apparently you need to do some special things to install WADs when you have 3.4 installed.
Q: Can I uninstall these hacks?
A: Sure - just use
Any Title Deleter to remove IOS249 and the USB Loader GX. If you can't find USB Loader GX within Any Title Deleter, and you still have the original WAD file in the WAD folder on your SD Card, you can use the WAD Manager to remove it too. Be careful with Any Title Deleter - it WILL allow you to delete critical system files (such as system IOS's in the double digits like 30, 36, 38, etc.) You risk bricking your Wii if you delete the system ones! Read up on IOS
here.
Q: Everything went great, but now my USB LAN Adapter/Rock Band Mic/Other USB Device doesn't seem to work when I launch from the USB Loader. What Gives?
A: Currently there is a known issue with IOS249 (the cIOS) that stops the Wii from recognizing a second USB device when using the USB Loader. Coder Hermes has attempted a fix for this with his IOS222. I have heard mixed results (some say it works, others say it doesn't), but the USB Loader GX will allow you to load games with the IOS222 after you've installed it. Click over to my
detailed article on IOS for links and a more detailed overview. Here's to hoping a future version of IOS249 fixes this problem.
Q: I don't have an internet connection - can I install cIOS without?
A: Yes - but you'll have to research how to do it and where to get the necessary base IOS files. I would absolutely stick to the internet installation if possible.
Q: I finished installing, but when I try to load a game, I get the 002 error! How do I fix this?
A: If you are using USB Loader GX, the fix is to click on the game that is giving you trouble, then in the spinning disc screen, click the little gear icon for settings specific to that game. Down toward the bottom there is an option for 002 error fix. Turn that on. Repeat for any other games that give you this error. It is possible to turn the 002 fix on for all games in the general settings, but that's not necessary.
Q: I'm trying to find the cIOS download link, but it's nowhere to be found! Where do I get it?
A: It looks like Waninkoko's site is no longer hosting the file. Try
here (thanks to the USB Loader GX guys). Google cIOS38_rev13 (or whatever version you're looking for). It's all over the place out there.
Q: Which version of WBFS Manager do I use? What is the difference between x86 and x64?
A: If you don't know that you have a 64-bit operating system, you probably have a 32-bit one. You can right-click on my computer, and if it says anywhere in the Windows description that you're running 64-bit (such as under System Type in Vista and Windows 7) then grab the 64-bit installer. x86 is the same as 32-bit. If you can't tell whether you have a 32-bit or a 64-bit operating system, it is very likely that you have a 32-bit one, so go ahead and grab the x86 installer.
Q: The covers aren't downloading via USB Loader GX! What happened? Where can I get them?
A: It looks like they've changed the website URL for the game/disc cover repository and the USB Loader GX team haven't updated their pointers. To manually download covers, go
here.
Q: The USB Loader doesn't recognize my hard drive! How do I troubleshoot?
A: There are a few things you can do:
- If your drive has jumpers, make sure they are set to Master. The loader won't recognize drives that are set as slaves.
- Not all hard drives are compatible. Make sure that you test with a couple hard drives. Seagates are particularly bad.
- Try the other USB port on the Wii.
- Try unplugging the hard drive, starting up the Wii, then plugging the drive in (so it gets plugged in after the Wii is already started)
Enjoy!
IF YOU HAVE WII FIRMWARE 4.0 INSTALLED, I HAVE PUT TOGETHER A SPECIAL GUIDE JUST FOR YOU! PLEASE HEAD OVER TO MY HOW TO STORE/LOAD WII GAMES VIA USB HARD DRIVE FOR SYSTEM MENU 4.0 POSTING!
Url to this pages:
http://nade.dk/web/nade/site.nsf/FramesetHP?readform&wmain=files/How_To_Store/Load_Wii_Games_Via_Usb_Hard_Drive_[Slick_Tricks]