MeGUI is one of the newer tools that has been designed with H.264 encoding in mind, while supporting other types of conversion, such as XviD. This guide shows you how to encode a H.264 (MP4) using MeGUI from a DVD as the primary example (instructions for converting other types of video files are also included).
This guide is aimed at intermediate users, basically users that are familiar with DVD conversion/backup and want to experiment with H.264 and MeGUI. As such, basic knowledge of DVD ripping and conversion is required, although brief instructions will be provided in any case.
Software you'll need (all freeware):


 Step 1: Installation
 Step 2: DVD Ripping
This step will rip (copy) the DVD files from the DVD disc to your hard drive, for further processing or burning straight to a DVD recordable. This step uses RipIt4Me (which will control and use DVD Decrypter, FixVTS as needed). Before you run RipIt4Me, make sure you don't have any other DVD decrypting/ripping tools running (like DVD43, AnyDVD, DVD Region+CSS Free) and also close any
conflicting programs. The instructions here are for you typical movie DVD - for episodic DVDs (eg. TV shows), please refer to
this RipIt4Me FAQ entry.
There are some running tips/notices for RipIt4Me in the
official guide (just below the table of contents).
This guide will not cover all aspects of RipIt4Me operation. If you run into problems or see error messages in this step, or simply want to read a more detailed guide on RipIt4Me, please refer to the
official RipIt4Me guide. There is also a
frequently asked questions document.
Pop the source DVD disc into your DVD drive.
Start RipIt4Me. From the "Logs/Settings" menu, select "Preferences" and uncheck the "Run DVD Shrink after rip" option under the "1-click" mode section. Press the "OK" button to save the changes.
Click on the

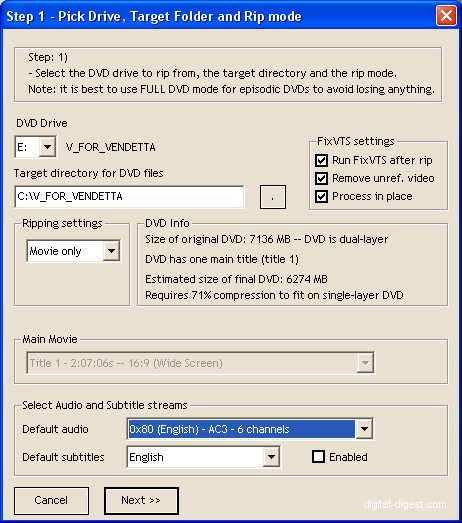
button. The following screen should come up:

Check to make sure the selected DVD drive letter is the correct one. The default output directory is based on the DVD's title, and this should be fine. Change the ripping setting to "Movie only" (again, if your DVD is an episodic one, please refer to
this RipIt4Me FAQ entry). The available audio and subtitle streams should now be shown down the bottom - you don't need to change anything, but you need to note down the stream number (eg. 0x80 => 1st stream, 0x81 => 2nd stream) for the audio, which you'll need to know for MeGUI. Press "Next" to continue.
RipIt4Me will now automatically start and operate all the required programs for ripping. When ripping has been finished, you will get a dialog box notifying you that the logs have been moved to another directory. You can view previously saved logs by using the "Log/Settings" -> "View saved logs" function (log files are needed when you run into a problem and want to get help in our (official)
RipIt4Me forum.
The DVD has now been ripped. You can now close RipIt4Me.
 Step 3: D2V Creator
 Step 4: AviSynth Script Creator
 Step 5a: Video Encoding Options MP4
 Step 5b: Video Encoding Options XVID
 Step 6: Audio Encoding Options
 Step 7: AutoEncode and starting the encoding
 MeGUI Custom x264/AVC video profiles. (Updated: 2006-12-21)
Url to this pages:
http://nade.dk/web/nade/site.nsf/FramesetHP?readform&wmain=files/Megui