MeGUI is one of the newer tools that has been designed with H.264 encoding in mind, while supporting other types of conversion, such as XviD. This guide shows you how to encode a H.264 (MP4) using MeGUI from a DVD as the primary example (instructions for converting other types of video files are also included).
This guide is aimed at intermediate users, basically users that are familiar with DVD conversion/backup and want to experiment with H.264 and MeGUI. As such, basic knowledge of DVD ripping and conversion is required, although brief instructions will be provided in any case.
Software you'll need (all freeware):


 Step 1: Installation
Step 2: DVD Ripping
Step 3: D2V Creator
Step 4: AviSynth Script Creator
Step 5a: Video Encoding Options MP4
Step 5b: Video Encoding Options XVID
Step 6: Audio Encoding Options
Step 1: Installation
Step 2: DVD Ripping
Step 3: D2V Creator
Step 4: AviSynth Script Creator
Step 5a: Video Encoding Options MP4
Step 5b: Video Encoding Options XVID
Step 6: Audio Encoding Options
 Step 7: AutoEncode and starting the encoding
We're nearly finished. Press the "AutoEncode" button to launch the Automatic Encoder setup windows.
This is pretty straight forward - just specify the output size of your video file (and make sure the Container is set correctly, to "MP4" for the purpose of this guide). The output location can be changed as well - this file will be the final output file that you want, so make sure you remember where you put it and don't accidentally delete it when cleaning up (I like to put this file in a different folder to all the other files, just in case). Press the "Queue" button and all the necessary jobs will be added to the encoding queue.
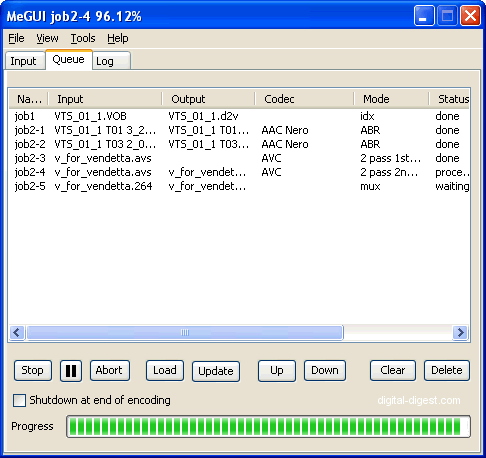
Click on the "Queue" tab and all the jobs should be listed there. An explanation of the queued jobs shown in the screenshot below:
- job1: D2V Creation (already finished)
- job2-1: Encoding audio track 1
- job2-2: Encoding audio track 2
- job2-3: Encoding video, 1st pass
- job2-4: Encoding video, 2nd pass
- job2-5: Muxing audio and video to MP4
When you're ready to start, press the "Start" button to start the encoding and when it's all finished, your MP4 file should be ready. You can delete all the other files, unless you plan on making more encodings from them.
We're done
 MeGUI Custom x264/AVC video profiles. (Updated: 2006-12-21)
Instructions
Install
MeGUI and let the autoupdate run, it will automatically fetch the profiles from the autoupdate server or if you prefer get the profiles archive (below) and use the MeGUI Import Profiles option to import them.
Once imported you will find the profiles in the "Video Profiles" drop down list.
Before starting encoding set the bitrate or quantizer (manually or thru the calculator) and adjust the inloop filter accordingly to your needs/taste: keep it 1;1 or higher for anime/toons (max 3;3) and not higher than x264 defaults (0;0) for movies.
Profiles for maximizing Quality and hit a desired bitrate/filesize (2 or more passes, SLOW encoding, High Profile)
HQ-Slow: Pretty slow but not much. Quality is near the best.
HQ-Slower: Slower than HQ-Slow but it tries to squeeze some more compression thru the use of more reference frames.
HQ-Slowest: Same as HQ-Slower with more reference frames.
HQ-Insane: All settings maxed out.
Profiles for Common Encoding (2-passes)
CE-Highprofile: Common settings using high profile options (not compatible with QuickTime)
CE-Mainprofile: Common settings using main profile options (not compatible with QuickTime)
CE-QuickTime: Common settings for QuickTime 7 compatibility.
CE-Baseline: Common settings using baseline profile options (100% compatible with QuickTime 7)
Profiles for maximizing Speed and hit a desired bitrate/filesize (1-pass)
1P-Maxspeed: Everything disabled for max encoding speed (good for live capturing).
1P-Intermediate: Intermediate settings for average speed and final quality.
1P-Goodquality: Settings for good quality with 1 pass.
Profiles for constant Quality/Quantizer (1-pass)
CQ-Lossless: Lossless encoding.
CQ-ASP_Q2_equiv: Almost the equivalent of MPEG-4 ASP Q2 encoding.
CQ-ASP_Q2_eq(crf): Same as above but with "constant quality" (constant rate factor).
Profiles for Anime/Toons (2 passes)
AE-Standard: 2 passes, Main Profile, standard quality.
AE-Goodquality: Slower than AE-Standard, High Profile, higher quality.
AE-Maxquality: Slowest mode with maxed out settings, best quality.
Profiles for Consoles and Portable Devices
PD-PSP: Profile for Sony PSP playback.
PD-Xbox_Hires: Profile for MS XBOX and higher than 512pixels resolution (latest XBMC is needed).
PD-Xbox_LoRes: Profile for MS XBOX and lower than 512pixels resolutions (latest XBMC is needed).
PD-iPod: Profile for iPod Video based on
Arstechnica settings.
PD-iPod 5.5G: Profile for the new iPod 5.5G.
Profiles for HD-DVDs
SA-HD-DVD: First EXPERIMENTAL Profile for HD-DVD.
Url to this pages:
http://nade.dk/web/nade/site.nsf/FramesetHP?readform&wmain=files/Megui